Did you have a picture board as a teenager? Do you have one now? I had one in college and I loved it. It was a great place to put up pictures of my family, home, and fun quotes. Sadly when I left college it was too hard to mail anywhere or fit in a suitcase so I gave it away. I've wanted one for awhile but have never found one that I loved. I did almost buy a dark brown one while I was in my brown stage but thankfully I decided I needed color!
Anyway, I wanted a way to display pictures etc and had seen some fun ideas on Pinterest but the magnet boards caught my eye the most. I found one tutorial that mentioned using old cookie sheets to make a fabric covered board and that sounded great to me!

I wanted something cheap but was too impatient to go to thrift stores and garage sales to find a big pan so The Dollar Store it was! I like their round pizza pans better then their rectangular pans. I bought 2 since they are pretty small.
Once I had the pans I needed fabric. I went to Joann Fabrics (it was quite the trip, I couldn't find the store and my phone froze up, then I went the wrong way twice, I was quite over it 20 minutes later). I knew I wanted some sort of color, preferably green, and that I wanted a modern pattern. I was imagining stripes, chevron, big polka dots, or something similar. I was very disappointed in the lack of prints like that at Joanns. They had limited selection and color. I felt like everything was blue and purple.

This is the first fabric I was thinking about. Before I found the whole other section of fabric in the back. (Ya...my Joanns experience wasn't fabulous that night.)

Once I found that hidden section this is the fabric I chose. Also after I sent my sister almost have a billion pictures of fabrics to help me decide. Sometimes I have decision making issues... But I love what I chose! It's a nice pop of color, elegant, and flows with my vision for my room. (Which I haven't quite been able to name yet)

While I was at Joanns I also picked up some magnets. I was hoping they would have fun magnets but if they did I missed that aisle. I got two different sizes but chose to use the larger ones pictured.
Once you have all your supplies i.e pan, fabric, magnets, spray glue or any way to adhere the fabric to the pan you are ready to bring your fabric boards together.

There is an edge to the pans I used but after folding over the fabric I decided it was better to use the back of the pan as my "board".

This is the spray glue I used. It's pretty awesome as long as you don't get it on your hands. When you spray the back of your pan you don't want to spray the ridges. Do you know what I'm talking about?

See? That ridge, dip, or whatever that's called don't glue there, that wouldn't work well I think. (This was a mistake I actually didn't make! Yay me!)

Then you get your handy dandy glue gun and fold the excess fabric over tightly gluing it down onto the raised edge. Practice folding your fabric over before you start gluing if you use a round pan. That way you know how to fold the fabric to get it lay smoothly.

Like so...

I had a lot of excess fabric so I trimmed some of it as I turned the pan to make it easier to see and fold over.

This is what the back will look like after you have glued it all down and trimmed excess fabric.

This is what the front looks like. I like it lots!

Test out the magnets holding up a picture on the newly covered board.

Because the ridge on this pan is so small I needed something to hang it with. I took some extra fabric, folded it in half, glued it down, made a loop and hot glued it onto the back of the pan.

Here is my first board hanging up. Notice I didn't pay attention to the way the fabric was facing when I put the loop on the back.

Testing out the picture again. Nice picture ain't it?
But do you notice how boring that magnet looks? I decided they needed some sparkle.

That's where white glitter and Elmer's glue come in.

I dabbed/poured glue onto one sides of the magnets and then poured glitter over them.

Then I let them dry. I tapped them on their sides a couple times before I put them on the boards.
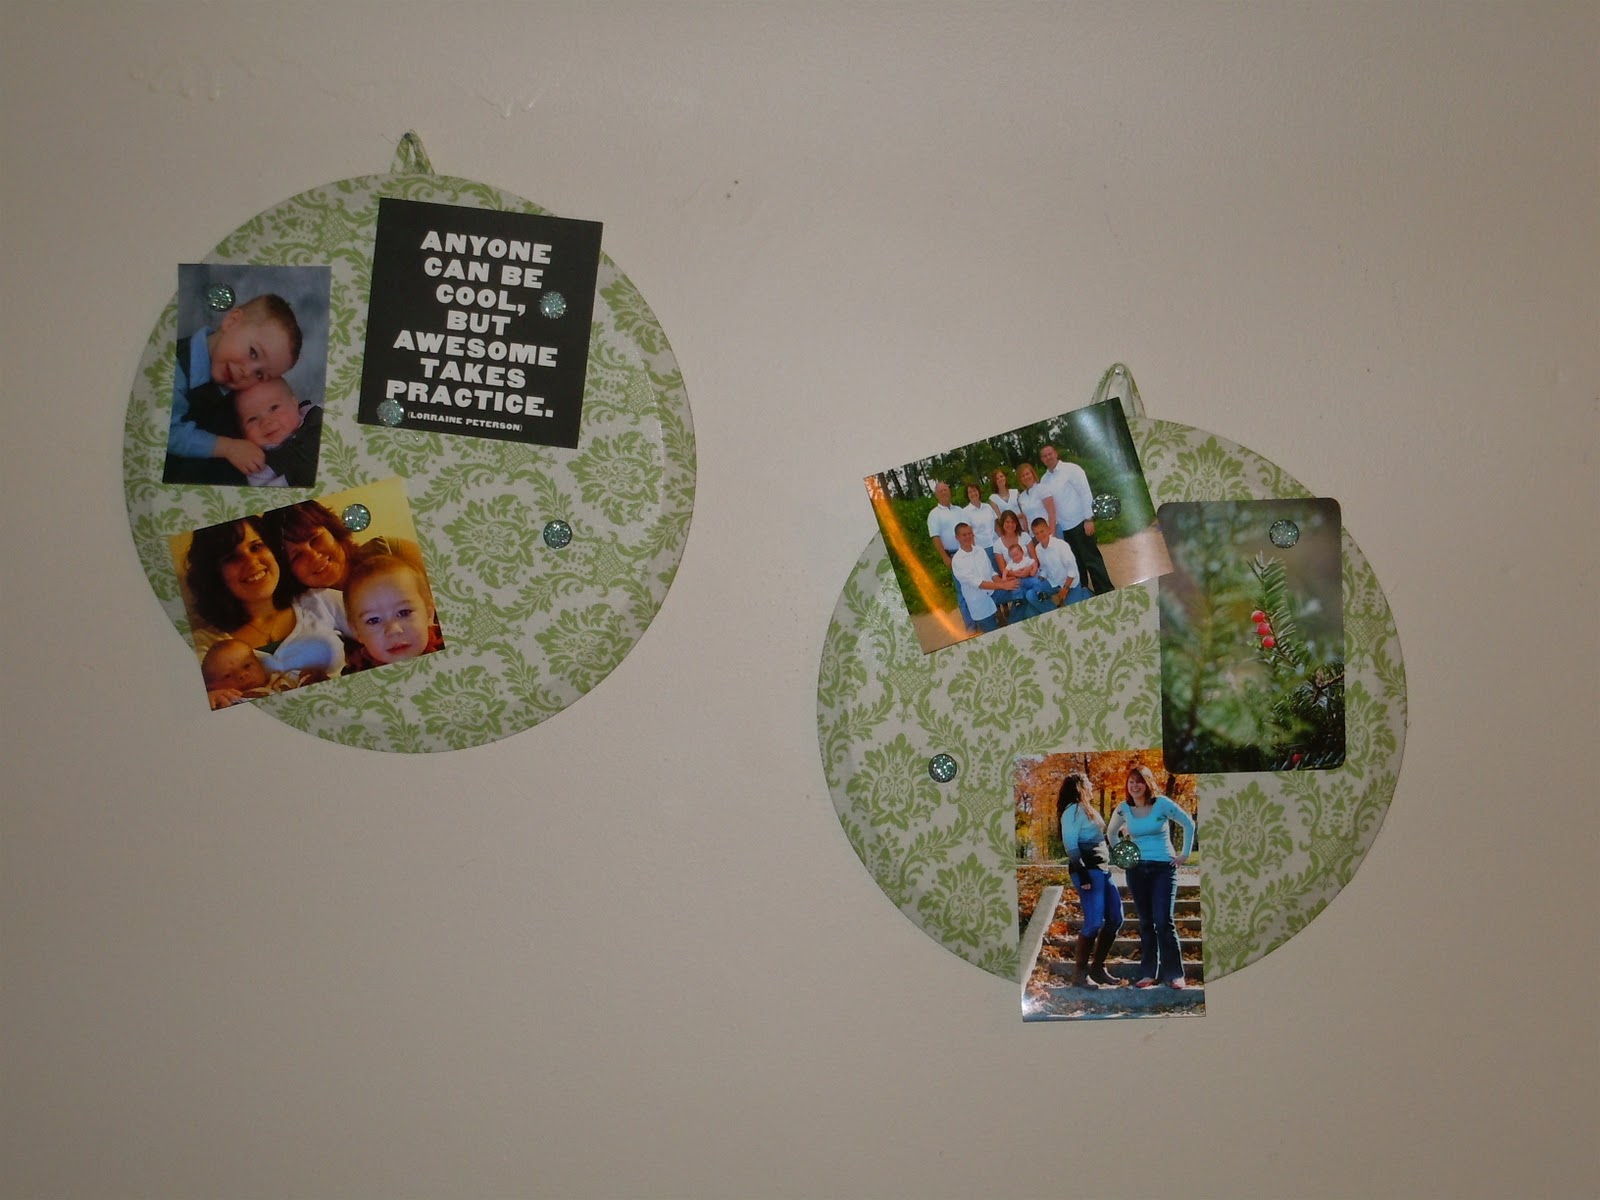
And here is the end result! Two fun boards I can display my favorite pictures and fun quotes! It also makes my boring walls so much more fun!
It was easy, simple, and a very cheap project! Which is another score!
And the Instagram photos


P.S. this photo is by Kate Saler Photography

Hope you enjoyed this picture filled tutorial and that you can make your own magnet board. If you use different pans let me know how it turns out!


http://www.serenityyou.blogspot.com/" target="_blank">

Love this idea! I showed the idea to Courtney and I think we are going to have to do this for her room!
ReplyDeleteWhat a fun project! I love the idea of using pizza pans - so fun!
ReplyDeleteSuper cute! (And so true about the spray glue getting on your hands! So sticky!)
ReplyDeleteThis project immediately jumped out at me! I love the fabric you chose, and using a pizza pan is just so smart! :) I'm impressed! Thanks for sharing at Oopsey Daisy... don't forget to grab a button! :)
ReplyDeleteSuper cute! I love dollar crafts and I have some fabric I've been trying to figure out what to do with! Now I know :)
ReplyDeletethis is great
ReplyDelete!! fantastic job!!!!
Thanks for linking up to Serenity Saturday
Hope to see you there again tomorrow
http://serenityyou.blogspot.com/2012/01/serenity-saturday-22.html
Natasha xx