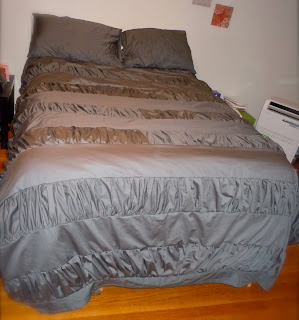
Drum Roll please!!!!!!
My ruffled duvet is finished!! Totally finished and on my bed! How completely cool is that! I'm ecstatic and I LOVE it! Here is the finished project and after that I will be doing a tutorial of sorts. So if you don't want to know how I made this or hear how many mistakes I made stop reading after the picture. If you do want to hear, see links, and read my ramblings read on, read on!
Okay, here we go! If you don't remember I found the tutorial for this duvet at Lexi Designs here. I fell in love with this chic yet simple look and since I didn't want to spend oh, $200 on my bedspread I adventured to make it. I'm not going to give you a real tutorial but I will tell you what I did and found to help me understand the tutorial I followed.
First you need supplies. The cheap target sheets didn't come in the color I wanted so after some research and suggestions I looked online at Ikea and found the exact color I wanted for about $8. (What an awesome price right?!) Now here is probably where I should mention that I bought the wrong sheets twice. Yes, twice I went to Ikea walked through the showrooms lost and trying to find the shopping market and picked up the wrong sheets. The second time I didn't catch it until I had opened the packages, washed the sheets, and dried them. (Yes, I am really that unobservant) My mistake was I bought only 1 flat sheet and 3 fitted sheets. So this is for you to learn from. Check all of the sheets you pick up to make sure you have the right stuff. Okay? Good.
Second step (if following lexi's tutorial) is making your strips. Because most of my sheets were fitted we had to do some maneuvering to make it all work. (It works better to iron your sheets before cutting) My sister and I took out the hem and elastic, folded the sheet and cut off the excess to make it square. Then you cut your strips. Well, you figure our how wide you want your strips and crunch numbers to make sure it all works with the size of your comforter. Because of the sheets we had we figured out we had to put two ruffled strips to match one straight strip.
Cutting strips
Ruffling your strips. This took us awhile to figure out because my sister and I aren't sewing proficient and have no manual for our sewing machine. So to make a stitch you can ruffle you have to loosen your stitch and keep the ends open. (Don't reverse your stitch to lock it in) We ran our stitch at a 5.0 and the ruffles worked well. Ruffling is quick but remember your ruffles will get spread out so you don't have to make it super tight. Another ruffle tip! After you ruffled both sides there will be a looong thread on the end. Do NOT cut this! If you cut it, like I did, when you spread out your ruffles you have problems. Enough said.
One of my first ruffles
Now that your ruffles are done you are going to sew them to a straight strip. I think everyone will have multiple ruffled strips to straight strips so sew those together first. I didn't really get what the Lexi tutorial was saying about sewing the ruffles to straight. It just didn't click with either me or my sister so we did some googling. (Man, I LOVE google) We found a different tutorial that made sense here and here. You just keep sewing strips until you have the length of your comforter. You just have to make sure you pin things on correctly so when you open it all up it's facing the right way. I say this because I messed that up as well.
You can kinda see the pins at the top there
Finally you are going to sew all your strips onto your bottom sheet. This would be a flat sheet the same size, hopefully slightly bigger, than your comforter. But before you start pinning please make sure you know which side is which. Like which side is the longest and how you want your comforter to go in and lay. Okay? Then you sew it all around but one short side. This is the side you will put your comforter through and then make a closure. I still haven't made my closure but I have an idea on what I am going to do. It includes some of my extra fabric and buttons. After all of that put it on your bed, step back, and be extremely happy with your handiwork!
So that's about what I did without talking about the other many fights we had with the sewing machine and snags we ran into. I like the fact that my duvet looks different from Anthropology and even Lexi's. It's unique! I will be adding bright colored pillows and things soon for pops of color. I'm thinking a light blue, bright green, and a purple. Oh, I have plans!
But I hope this made some sense and it helps you if you decide to make your own ruffled duvet! Thank you to my sister who did 95% of the sewing and helped me think things through so we made less mistakes.
Close up!


Great job! I love it! Makes me want to do one as well!!
ReplyDelete